RPCw-41 vs3 – Molding Party
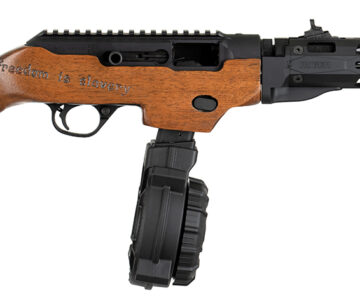
Why doesn’t anyone make a wood stock for the Ruger PC Carbine? Lots of us have asked ourselves and the internet this question. After having pursued this myself, I have an idea.
I think it all comes down to seating the magazine properly. The 10/22 is really easy to make a stock for. You route out a fairly simple shape, drop in your receiver, and off you go. It’s a ton more work than that, but basically is just carving and finishing.
All of that applies to the RPC except the magazine comes up and interacts with parts in the stock, separate from the receiver. In my first 2 versions I just brute strength Dremeled it by sight, but that is not easily repeatable, and I also had to make my own release setup because my tolerances were way wonky.
Here’s my hot-glue mold in action. Works great with the silicone rubber.

This was actually cooler than it should have been for me. A son of a gun to pull out, but it’s basically intact.

Missing the pouring of epoxy image, but here is the result after the mold is removed. Epoxy is basically magic.

This epoxy job worked, and was dry for about a day before I decided to cut it out and redo the whole section. I mistakenly thought I should have pour channels on the top (the hot glued bolts).

Taped the bottom and sides then dumped in the silicone rubber.

Looks like a glorious blue jello.

The reason I can pour from this side is because I’m cutting away the wood on the sides, which allows a gap.

The mold was a little challenging to remove because of this point right here.


After cutting out the shape I cut this circle where the mag release lives. This will allow me to pour in the mold without having to be precise at all.

New carving process. Route as much as possible out and then use the drill press to cut out circles. I left the top and middle channel of wood crossing over to the other side.

And here I drop the mould into the fully carved out center. I must have taken this photo when I did the initial fitting and before I cut the hole on the side.

Hot glue is your best friend. Awesome seal, because that silicone tries its best to escape.

I have a separate mold for the left and right side. Line it up and hot glue that sucker.

This may be too powerful. That glue comes out fire.

I screwed up because that bottom should have been open. I didn’t seat the mold deep enough and the epoxy collected on the top where it shouldn’t have. That’s okay though, I was able to fix it.

I used some black pigment to mix with the epoxy. Worked very well.

This looks kind of like a birds ear.

Boom baby. This is after sanding and some danish oil. I’ll add final photos after I seal it up. Man, it’s a strong strong look. Love it. Next stop, shooting.